[AWS] SpringBoot 에서 SQS 사용하기 (send, receive)
- AWS SQS 활용하기
- 참고사이트
직접 Restful API 적용한 내용을 참고하고 싶으면 여기 와 여기에서 확인 가능합니다.
시작하기 전에 앞서
여러 블로그을 참고하여 진행하다보니 아래와 같은 에러가 발생했습니다.
- com.amazonaws.SdkClientException: Unable to load AWS credentials from any provider in the chain
- javax.jms.JMSException: AmazonClientException: getQueueUrl.
- java.lang.IllegalArgumentException: profile file cannot be null
위 에러는 모두 SQS 커넥션 설정이 무언가 제대로 되지 않았다는 내용이며, 아마 아래와 같은 방법으로 커넥션을 생성 할 때 발생했을겁니다.
1
2
3
4
5
.withCredentials(new ProfileCredentialsProvider("username"))

.withCredentials(DefaultAWSCredentialsProviderChain.getInstance())

.withCredentials(new DefaultAWSCredentialsProviderChain())
위 오류를 해결을 원한다면 Access Key 발급 후 아래 내용대로 차근차근 진행하면 되니 같은 오류 발생하신 분들 모두 화이팅입니다.
의존성 추가
SQS 를 사용하기 위한 의존성을 추가
1
2
// https://mvnrepository.com/artifact/com.amazonaws/amazon-sqs-java-messaging-lib
implementation 'com.amazonaws:amazon-sqs-java-messaging-lib:1.0.8'
Connection 생성
1
2
3
4
5
6
7
8
9
10
11
12
13
14
15
16
17
18
19
20
21
22
23
24
import org.springframework.context.annotation.Bean;
import org.springframework.context.annotation.Configuration;

import com.amazon.sqs.javamessaging.ProviderConfiguration;
import com.amazon.sqs.javamessaging.SQSConnectionFactory;
import com.amazonaws.auth.AWSStaticCredentialsProvider;
import com.amazonaws.auth.BasicAWSCredentials;
import com.amazonaws.services.sqs.AmazonSQS;
import com.amazonaws.services.sqs.AmazonSQSClientBuilder;

@Configuration
public class SqsConfig {

	public static final String ACCESS_KEY = "ACCESS_KEY";
	public static final String ACCESS_SECRET = "ACCESS_SECRET";
	public static final String REGION = "ap-northeast-2";

    @Bean
    public SQSConnectionFactory sqsConnectionFactory() {
    	BasicAWSCredentials awsCredentials = new BasicAWSCredentials(ACCESS_KEY, ACCESS_SECRET);
    	AmazonSQS sqs = AmazonSQSClientBuilder.standard().withRegion(REGION).withCredentials(new AWSStaticCredentialsProvider(awsCredentials)).build();
        return new SQSConnectionFactory(new ProviderConfiguration(), sqs);
    }
}
테스트용 코드 작성
1
2
3
4
5
6
7
8
9
10
11
12
13
14
15
16
17
18
19
20
21
22
23
24
25
26
27
28
29
30
31
32
33
34
35
36
37
38
39
40
41
42
43
44
45
46
47
48
49
50
51
52
53
54
55
56
57
58
59
60
61
62
63
64
65
66
67
68
69
70
71
72
73
74
75
76
77
78
79
80
81
82
83
84
85
86
87
88
89
90
91
92
93
94
95
96
97
98
99
100
101
102
103
104
105
106
107
108
109
110
111
112
113
114
115
116
117
118
119
120
121
122
123
124
125
126
127
128
129
130
131
132
133
import java.util.HashMap;
import java.util.Map;

import javax.jms.JMSException;
import javax.jms.Message;
import javax.jms.MessageConsumer;
import javax.jms.MessageProducer;
import javax.jms.Queue;
import javax.jms.Session;
import javax.jms.TextMessage;

import org.springframework.stereotype.Component;

import com.amazon.sqs.javamessaging.AmazonSQSMessagingClientWrapper;
import com.amazon.sqs.javamessaging.SQSConnection;
import com.amazon.sqs.javamessaging.SQSConnectionFactory;
import com.amazonaws.services.sqs.model.CreateQueueRequest;

import lombok.RequiredArgsConstructor;

@Component
@RequiredArgsConstructor
public class SqsComponent {

	private final SQSConnectionFactory sqsConnectionFactory;

	public String sendMessage(String message) {
		Session session = null;

		String queueName = "testQueue";

        try {
            // Connection 생성하기.
            SQSConnection connection = sqsConnectionFactory.createConnection();
            makeQueue(connection, queueName);

            session = connection.createSession(false, Session.AUTO_ACKNOWLEDGE);
            Queue queue = session.createQueue(queueName);
            MessageProducer producer = session.createProducer(queue);
            TextMessage textMessage = session.createTextMessage(message);
            producer.send(textMessage);

        } catch (Exception e) {
            System.out.println(e.getMessage());
            System.out.println(e);

            throw new RuntimeException(e);
        } finally {
            if (session != null) {
                try {
                    session.close();
                } catch (JMSException e) {
                    System.out.println(e.getMessage());
                    System.out.println(e);
                    throw new RuntimeException(e);
                }
            }
        }

        return message;
	}

	private void makeQueue(SQSConnection connection, String queueName) throws Exception {
        // Get the wrapped client
        AmazonSQSMessagingClientWrapper client = connection.getWrappedAmazonSQSClient();

        // Create an SQS queue named MyQueue, if it doesn't already exist
        if (!client.queueExists(queueName)) {
            client.createQueue(queueName);
        }
    }

	public String receive(final String queueName) throws RuntimeException {
        Session session = null;

        try {
            // Connection 생성하기.
            SQSConnection connection = sqsConnectionFactory.createConnection();

            makeQueue(connection, queueName);
//            makeFifoQueue(connection, queueName);

            session = connection.createSession(false, Session.AUTO_ACKNOWLEDGE);
            Queue queue = session.createQueue(queueName);
            // Create a consumer for the 'MyQueue'
            MessageConsumer consumer = session.createConsumer(queue);
            // Start receiving incoming messages
            connection.start();

            // Receive a message from 'MyQueue' and wait up to 1 second
            Message receivedMessage = consumer.receive(1000);

            // Cast the received message as TextMessage and display the text
            if (receivedMessage != null) {
                System.out.println("Received: " + ((TextMessage) receivedMessage).getText());
                return ((TextMessage) receivedMessage).getText();
            }
            return null;

        } catch (Exception e) {
            System.out.println(e.getMessage());
            System.out.println(e);

            throw new RuntimeException(e);
        } finally {
            if (session != null) {
                try {
                    session.close();
                } catch (JMSException e) {
                    System.out.println(e.getMessage());
                    System.out.println(e);
                    throw new RuntimeException(e);
                }
            }
        }
    }

	private void makeFifoQueue(SQSConnection connection, String queueName) throws Exception {
        // Get the wrapped client
        AmazonSQSMessagingClientWrapper client = connection.getWrappedAmazonSQSClient();

        String fQueueName = String.format("%s.fifo", queueName);
        // Create an Amazon SQS FIFO queue named MyQueue.fifo, if it doesn't already exist
        if (!client.queueExists(fQueueName)) {
            Map<String, String> attributes = new HashMap<String, String>();
            attributes.put("FifoQueue", "true");
            attributes.put("ContentBasedDeduplication", "true");
            client.createQueue(new CreateQueueRequest().withQueueName(fQueueName).withAttributes(attributes));
        }
    }
}
마치며
위 내용을 테스트 해보고 싶다면, 본인의 Access Key 와 Secret, queueName 을 본인의 값으로 입력 하고 호출하면 됩니다.
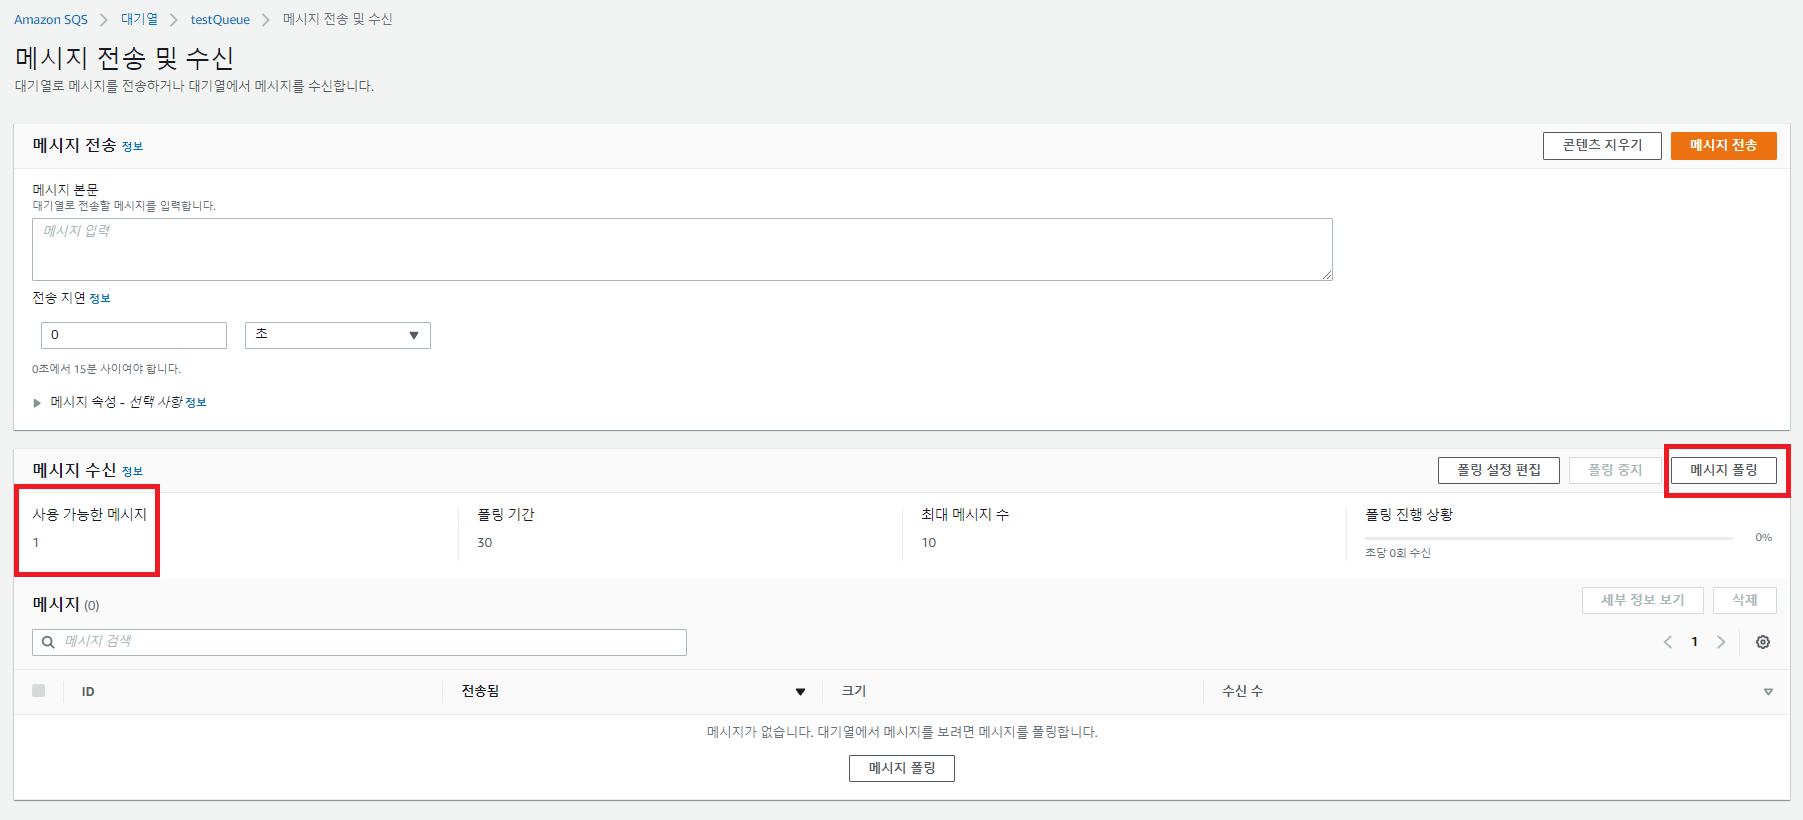
sendMessage 메소드를 호출 시 아래 이미지와 같이 AWS Console의 대기열 큐에서 확인 가능합니다.
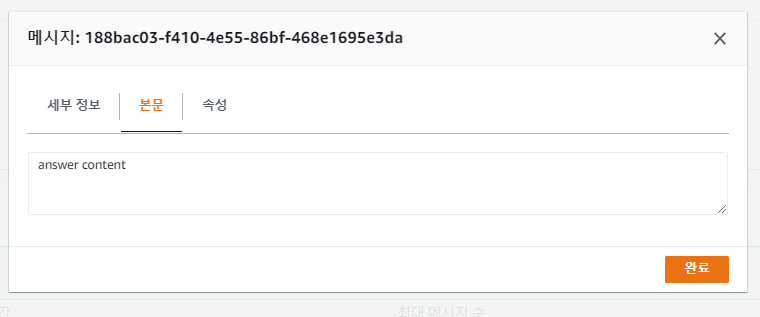
사용 가능한 메시지 부분에 1이 표시되어 있고, 우측에 있는 메세지 폴링을 누르면 메세지를 가져올 수 있습니다. 가지고 온 메세지를 선택하면 아래와 같이 메세지 확인이 가능합니다.
receive 메소드를 호출하면 아래 메세지를 직접 받아 볼 수 있습니다.


Leave a comment